> ## Documentation Index
> Fetch the complete documentation index at: https://docs.qa.tech/llms.txt
> Use this file to discover all available pages before exploring further.
# Configs
> Manage reusable test variables and data across your tests
 ## What are Configs?
Configs are sets of data that tests can access and use during execution. Think of them as variables for your test cases - values you want the agent to use automatically. They're commonly used for:
* Login credentials
* Email addresses
* File uploads
**Security Notice: Use Test Credentials Only** Config data (including
passwords and credentials) is **stored unencrypted** and is passed directly to
AI language models during test execution. This is by design to enable the AI
agent to authenticate during testing. **Never use real user credentials or
production passwords.** Always create dedicated test accounts with limited
permissions for your QA.tech tests.
### Configs and variables
If you are looking for variables or environment variables, configs are where
QA.tech keeps them. A config is a named, reusable value (or set of values) that
your tests share, so you do not have to repeat the same data in every test.
Unlike traditional test tooling, there is no `{{variable}}` placeholder syntax
to learn. Configs are resolved by the AI agent. At run time, each config you
attach to a test is passed to the agent together with its name and description,
and the agent decides when and where to use the values.
In your test steps you describe intent rather than hardcoding values. For
example, write "Log in with the configured credentials" instead of typing a
username and password. The agent reads the matching config at run time and fills
in the values. This is also why a clear config name and description matter: they
help the agent pick the right config when several are available.
### Adding a New Config
1. Navigate to Settings » Configs
2. Click "Add config"
3. Select a template
4. Fill in required fields
5. Optionally add a **description** explaining when the config should be used
6. Save your configuration
### Config Descriptions
Each config has an optional **Description** field. Use it to explain when the
config should be used — for example which user role or scenario it represents.
The assistant reads the description (alongside the config name) when deciding
which config or login a test should use, and the test agent also receives it
during execution. A clear description helps disambiguate similar configs without
needing a separate Assistant Rule or Memory entry.
For example, if you have two patient logins, you might describe one as:
> Use this for tests that need a privately-paying patient. Do not use for
> regionally-funded flows.
With that description in place, the assistant can pick the correct login on its
own when generating or running tests.
### Using Configs in Tests
Assign configs to a test case under **Settings » Configs**. When creating or editing a test, select which variables the test should use - the agent receives them automatically at run time.
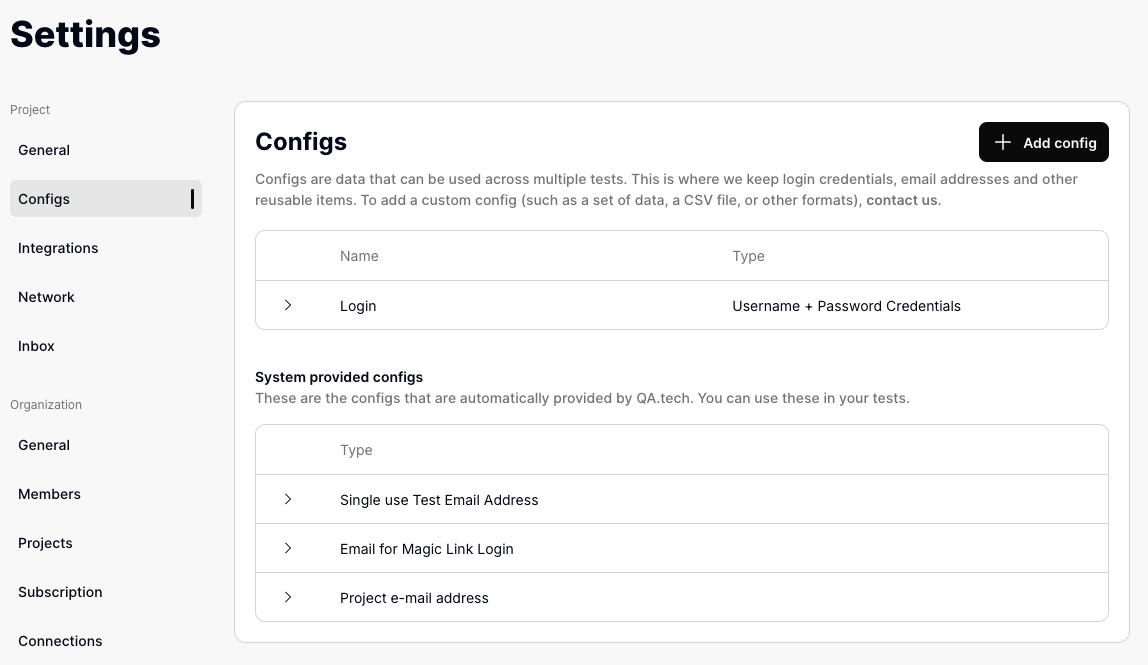
### System-Provided Configs
QA.tech automatically provides several configs for common testing needs:
1. **Single use Test Email Address**
* Generates a unique email for each test session
* Perfect for email verification flows
* Includes access to [email inbox](/test-features/email-inbox)
2. **Email for Magic Link Login**
* Format: `magic-login-xxxxx@qatech.email`
* Dedicated for magic link authentication flows
* Includes [inbox monitoring](/test-features/email-inbox)
3. **Project e-mail address**
* Format: `prj-xxxxx@qatech.email`
* Project-specific email address
* Permanent address for your project
### Creating Custom Configs
1. **Username + Password Credentials**
* For standard authentication
* Fields: Username (can be email) and password
* Optional "Use for Basic Auth" checkbox for HTTP Basic Authentication
The "Use for Basic Auth" checkbox is for **HTTP Basic Authentication**,
which is different from regular login forms. **Enable this when your tests
need to access:** - Staging or testing environments protected with browser
authentication popups - URLs that trigger browser dialogs asking for
username/password - Corporate proxies or internal tools requiring basic
authentication - Password-protected development environments When enabled,
QA.tech automatically supplies these credentials to the browser whenever it
encounters an HTTP Basic Auth challenge, so your tests can proceed without
manual intervention.
**Important:** This is for the HTTP Basic Authentication protocol (RFC
7617\), not for testing login forms on your website. For regular login
forms, create a Username + Password config and leave "Use for Basic Auth"
disabled.
2. **Username + Password Credentials - with Two-Factor Authentication**
* For two-factor authentication flows
* Includes 2FA setup (Google Authenticator/Authy)
3. **Valid Email + Password Login Credentials**
* Includes generated unique email
* Password management
* [Email inbox access](/test-features/email-inbox)
4. **File Upload**
* Upload static files for testing
* Maximum size: 250MB
* Supports any file type (no MIME type or extension restrictions)
5. **Custom Fields**
* Reusable key-value pairs for any data the agent might need, such as a name,
phone number, address, or token
* Each field has a key and a value, and you can add as many fields as you need
* Field keys must be unique within the config (case-insensitive)
* The agent receives each field as a `key: value` line, alongside the config
name and description
### Custom Fields Example
A **Custom Fields** config named "Patient details" with fields for `fullName`,
`phone`, and `memberId` reaches the agent as:
```
Patient details (Use for privately-paying patient flows):
fullName: Jane Doe
phone: +1-555-0100
memberId: PAT-4421
```
In your test you can then write "Register a new patient using the configured
patient details" and the agent will use these values.
## What are Configs?
Configs are sets of data that tests can access and use during execution. Think of them as variables for your test cases - values you want the agent to use automatically. They're commonly used for:
* Login credentials
* Email addresses
* File uploads
**Security Notice: Use Test Credentials Only** Config data (including
passwords and credentials) is **stored unencrypted** and is passed directly to
AI language models during test execution. This is by design to enable the AI
agent to authenticate during testing. **Never use real user credentials or
production passwords.** Always create dedicated test accounts with limited
permissions for your QA.tech tests.
### Configs and variables
If you are looking for variables or environment variables, configs are where
QA.tech keeps them. A config is a named, reusable value (or set of values) that
your tests share, so you do not have to repeat the same data in every test.
Unlike traditional test tooling, there is no `{{variable}}` placeholder syntax
to learn. Configs are resolved by the AI agent. At run time, each config you
attach to a test is passed to the agent together with its name and description,
and the agent decides when and where to use the values.
In your test steps you describe intent rather than hardcoding values. For
example, write "Log in with the configured credentials" instead of typing a
username and password. The agent reads the matching config at run time and fills
in the values. This is also why a clear config name and description matter: they
help the agent pick the right config when several are available.
### Adding a New Config
1. Navigate to Settings » Configs
2. Click "Add config"
3. Select a template
4. Fill in required fields
5. Optionally add a **description** explaining when the config should be used
6. Save your configuration
### Config Descriptions
Each config has an optional **Description** field. Use it to explain when the
config should be used — for example which user role or scenario it represents.
The assistant reads the description (alongside the config name) when deciding
which config or login a test should use, and the test agent also receives it
during execution. A clear description helps disambiguate similar configs without
needing a separate Assistant Rule or Memory entry.
For example, if you have two patient logins, you might describe one as:
> Use this for tests that need a privately-paying patient. Do not use for
> regionally-funded flows.
With that description in place, the assistant can pick the correct login on its
own when generating or running tests.
### Using Configs in Tests
Assign configs to a test case under **Settings » Configs**. When creating or editing a test, select which variables the test should use - the agent receives them automatically at run time.
### System-Provided Configs
QA.tech automatically provides several configs for common testing needs:
1. **Single use Test Email Address**
* Generates a unique email for each test session
* Perfect for email verification flows
* Includes access to [email inbox](/test-features/email-inbox)
2. **Email for Magic Link Login**
* Format: `magic-login-xxxxx@qatech.email`
* Dedicated for magic link authentication flows
* Includes [inbox monitoring](/test-features/email-inbox)
3. **Project e-mail address**
* Format: `prj-xxxxx@qatech.email`
* Project-specific email address
* Permanent address for your project
### Creating Custom Configs
1. **Username + Password Credentials**
* For standard authentication
* Fields: Username (can be email) and password
* Optional "Use for Basic Auth" checkbox for HTTP Basic Authentication
The "Use for Basic Auth" checkbox is for **HTTP Basic Authentication**,
which is different from regular login forms. **Enable this when your tests
need to access:** - Staging or testing environments protected with browser
authentication popups - URLs that trigger browser dialogs asking for
username/password - Corporate proxies or internal tools requiring basic
authentication - Password-protected development environments When enabled,
QA.tech automatically supplies these credentials to the browser whenever it
encounters an HTTP Basic Auth challenge, so your tests can proceed without
manual intervention.
**Important:** This is for the HTTP Basic Authentication protocol (RFC
7617\), not for testing login forms on your website. For regular login
forms, create a Username + Password config and leave "Use for Basic Auth"
disabled.
2. **Username + Password Credentials - with Two-Factor Authentication**
* For two-factor authentication flows
* Includes 2FA setup (Google Authenticator/Authy)
3. **Valid Email + Password Login Credentials**
* Includes generated unique email
* Password management
* [Email inbox access](/test-features/email-inbox)
4. **File Upload**
* Upload static files for testing
* Maximum size: 250MB
* Supports any file type (no MIME type or extension restrictions)
5. **Custom Fields**
* Reusable key-value pairs for any data the agent might need, such as a name,
phone number, address, or token
* Each field has a key and a value, and you can add as many fields as you need
* Field keys must be unique within the config (case-insensitive)
* The agent receives each field as a `key: value` line, alongside the config
name and description
### Custom Fields Example
A **Custom Fields** config named "Patient details" with fields for `fullName`,
`phone`, and `memberId` reaches the agent as:
```
Patient details (Use for privately-paying patient flows):
fullName: Jane Doe
phone: +1-555-0100
memberId: PAT-4421
```
In your test you can then write "Register a new patient using the configured
patient details" and the agent will use these values.