Testing a mobile app?
Native iOS and Android POCs have separate requirements — APK/simulator builds,
mobile IP ranges, and backend allowlisting. See the Mobile POC Setup
Checklist.
Before kickoff — verify these are ready
What to verify, and effort if not ready
Work through these in order. Network access usually takes the longest when IT is involved.1. Network access
QA.tech browser tests exit through a fixed pool of outbound IPs. Your CDN, WAF, or firewall must allow traffic from these addresses.Web testing IPs
Get the current list from Settings → Network or the Get Outbound IPs API. Copy the addresses into your CDN, WAF, firewall, or IP allowlist. Forward to IT: Email pre-filled request to your IT team Or send the request to your contact person at QA.tech, who can help coordinate with your IT team.Private or VPN-protected environments
If staging is not on the public internet, set up an SSH Tunnel Proxy through a bastion host and whitelist QA.tech IPs on the bastion’s SSH port.Your team verifies
- Staging URL loads in a browser from outside your office network (or via the jump server)
- IT has applied the IP allowlist and changes have propagated (allow 5–10 minutes for CDNs)
QA.tech verifies during setup
- Environment is reachable from QA.tech infrastructure
- A simple navigation or login test completes without 403, timeout, or CAPTCHA errors
2. Authentication
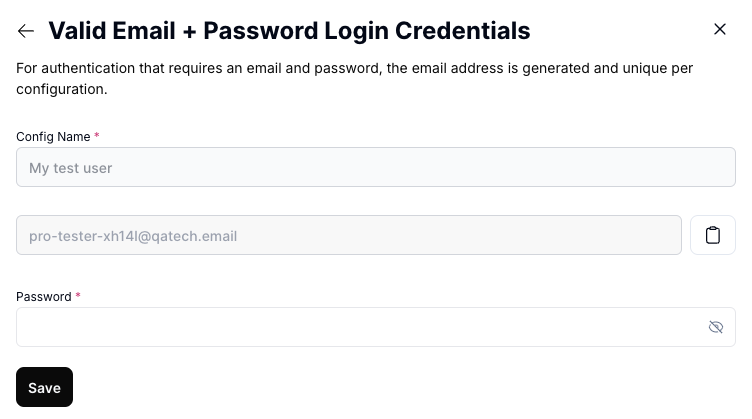
Dedicated test accounts let the AI agent log in without manual steps. Create them in staging, then share credentials with QA.tech for Configs.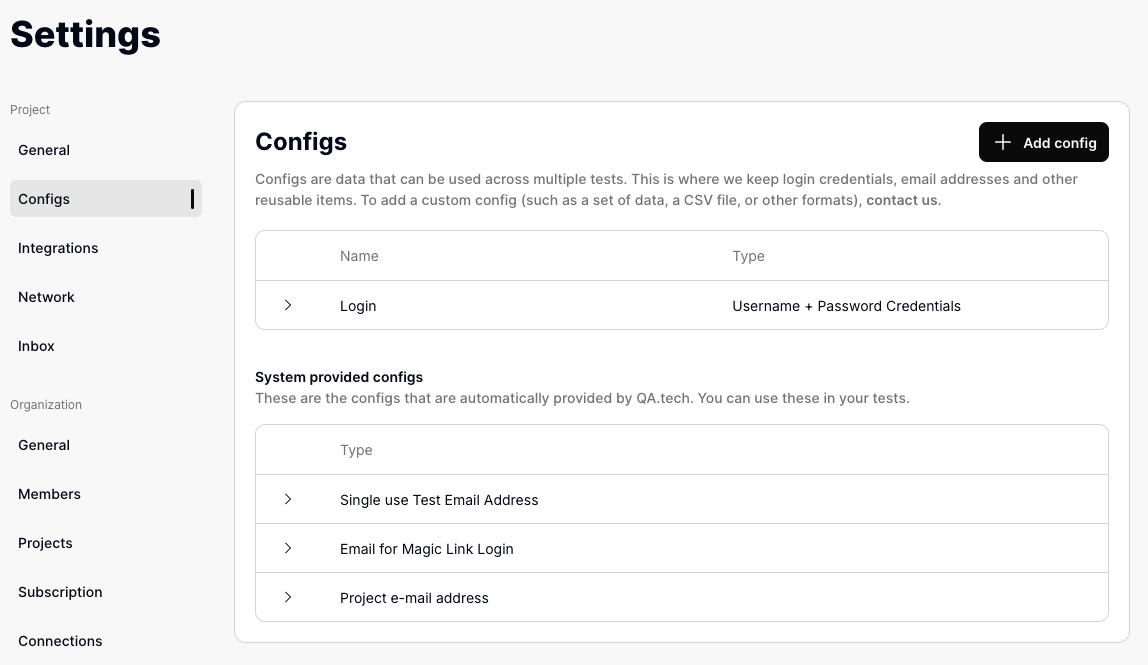
1
Create test accounts in staging
One account per role you want to demonstrate (admin, standard user, etc.).
Use credentials that exist only in non-production environments.
2
Verify login on your staging environment
Log in manually with each test account before the kickoff. Fix any account,
SSO, or rate-limit issues on your side first.
3
Share credentials with QA.tech
QA.tech adds them to Settings →
Configs during
project setup. Or send them to your contact person at QA.tech, who will add
them for you. See Authentication for 2FA,
OTP, and magic-link configs.
3. Email delivery
Flows like signup verification, password reset, OTP, and magic links depend on your app delivering email to QA.tech inboxes (@qatech.email).
Allow @qatech.email
Your IT team needs to allow the entire @qatech.email domain in signup restrictions, email gateways, and spam filters.
Forward to IT: Email pre-filled request to your IT team
Or send the request to your contact person at QA.tech, who can help coordinate with your IT team.
Your team verifies
- Create a test account using a
@qatech.emailaddress (or ask QA.tech for the project address) - Trigger a verification or magic-link email from your app
- Confirm the email arrives within a few minutes
QA.tech verifies during setup
- Email inbox receives mail from your staging environment
- An email-based login or verification test completes end-to-end
4. Environment & test data
Environment
Provide a staging or QA URL — not production. QA.tech adds it under Settings → Applications & Envs. See Applications and Environments. If your POC spans multiple apps (customer frontend + admin panel), share each URL separately.Test data
The environment must contain scrubbed, non-sensitive data:- No real customer PII (names, emails, addresses, payment details)
- No GDPR-regulated personal data unless anonymized through a documented process
- Repeatable state — accounts and sample records for the journeys you want to demo
Seed login accounts, sample records, feature flags, and sandbox modes for third-party integrations (payments, SMS) before kickoff.
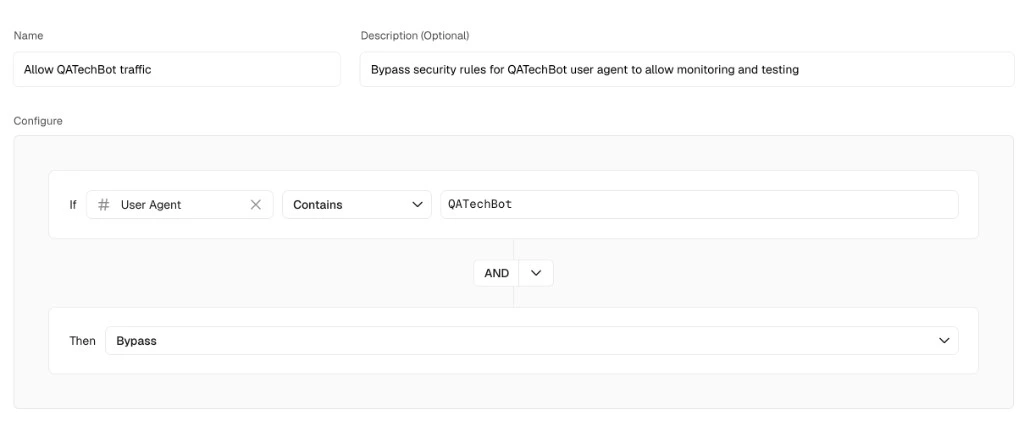
5. WAF & bot protection
If staging sits behind deployment protection or bot detection, configure bypasses before the POC.